Send a Group Chat
Group chat notifications are ideal when you need to notify multiple Users without using a Channel.
Great examples include:
- Process Status Notifications
- Error Notifications
- Simple Alerts
Permissions Required
| Permission | Description |
| Manage Flow | To create the Flow |
| Teams Designer (Perm Set) | To work with this package's Flow Actions. |
Create Group Chat
In order for our bot to send a notification into a Group Chat, that Group Chat must be created by our bot. When the Group Chat is created, Microsoft Teams provides us with an ID that can be used for sending future notifications.
This action performs a Callout, so if you are wanting to do this as part of a Record Triggered Flow, be sure to include an Asynchronous path.
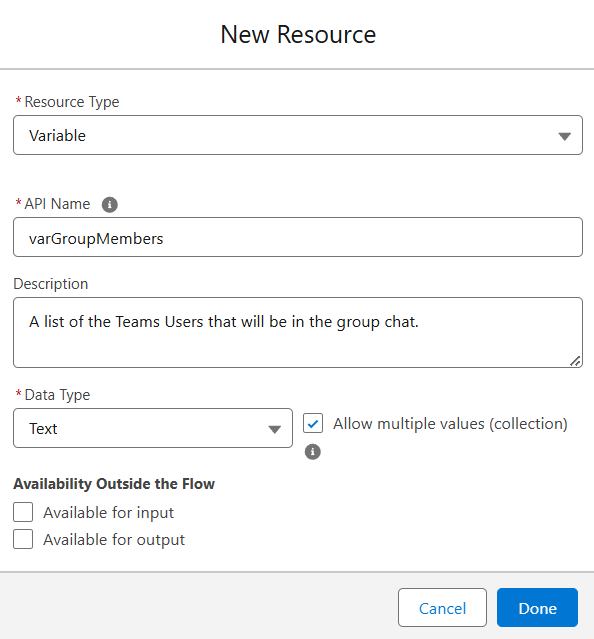
From a Flow, we can start by adding a new Variable to hold the list of Users that will be participating in this Group Chat (they must exist in Teams).
- Open the Toolbox
- Click New Resource
- Choose Resource Type: Variable
- Provide an API name that you will use inside the Create Group Chat action
- (optional) Add a description for this variable
- Choose Data Type: Text
- Check the box for Allow multiple values (collection)
- Click Done
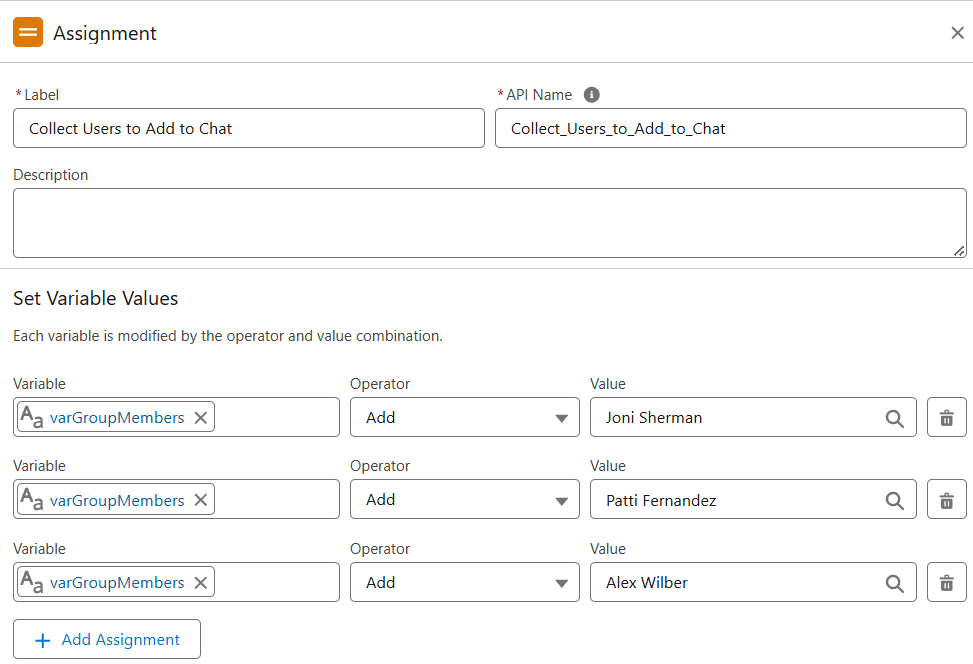
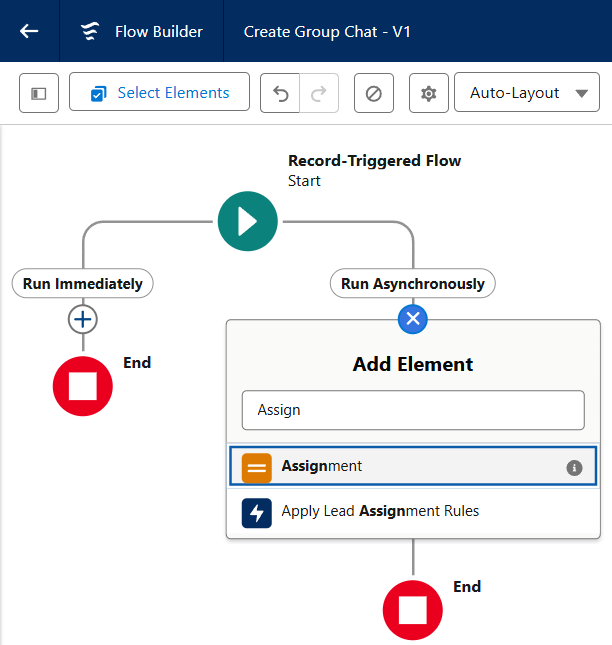
Next, we need to populate the Collection of Users. There are many ways to accomplish this (depending on your data structure). In our example, we will "hard code" a list of Users.
- On the Flow Canvas, add a new Element
- Search for Assign, select Assignment
- Add Teams Users to the Collection variable.
- Close the Element's Details panel when done.
While using the Full Name can work, it is best to use Email Address in the event you have multiple people with the same name.
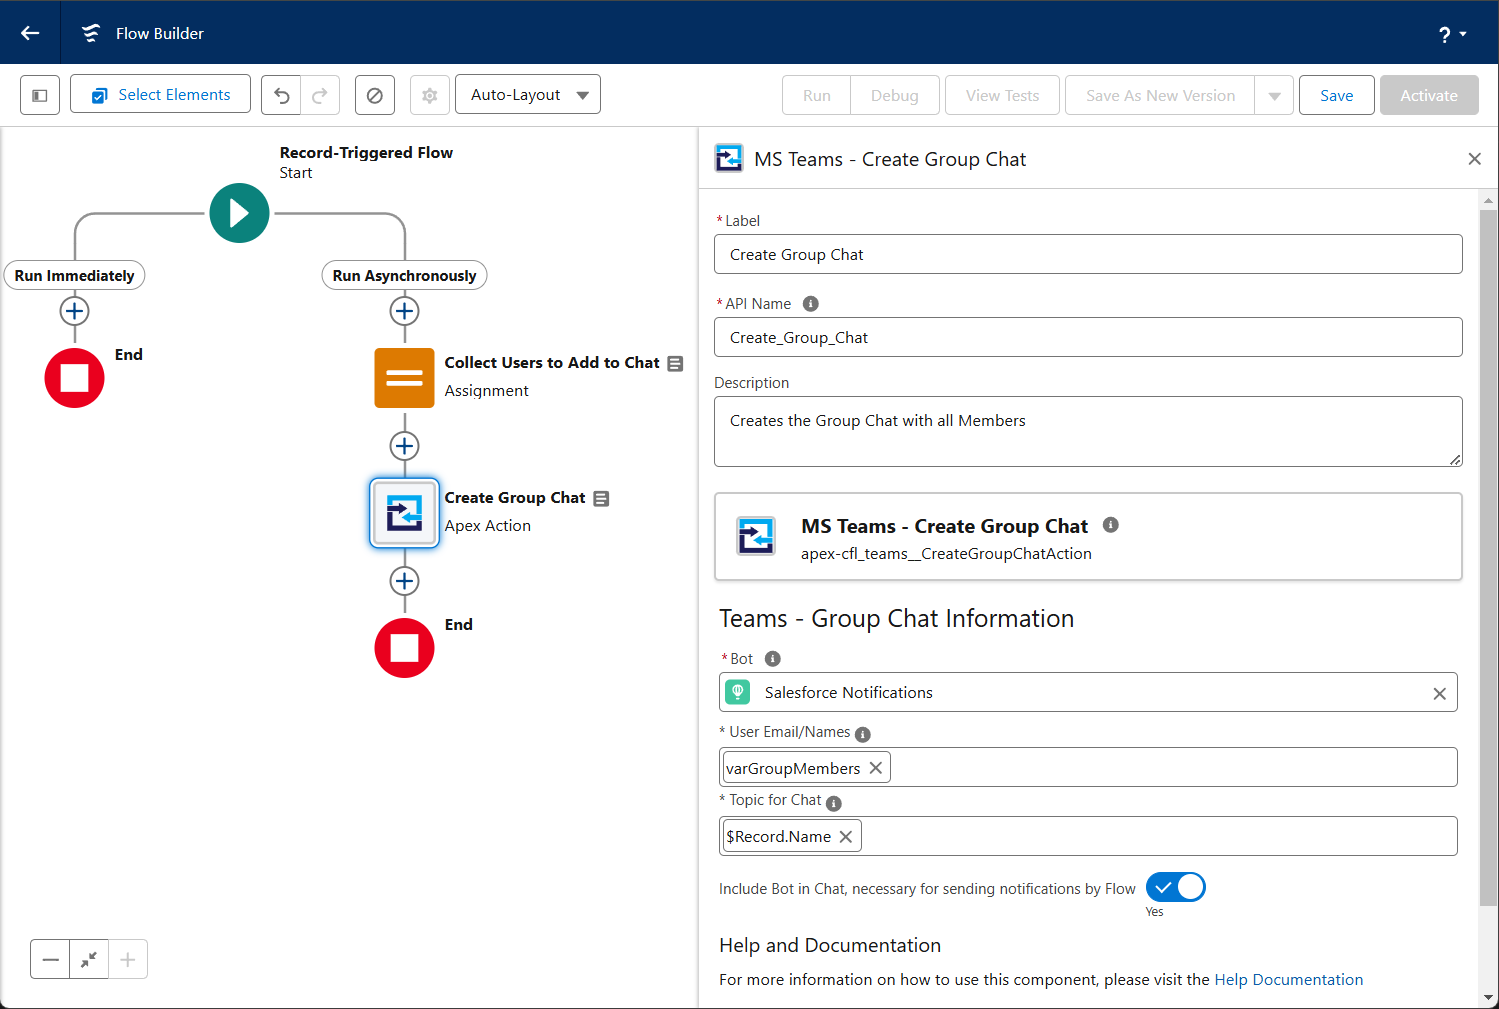
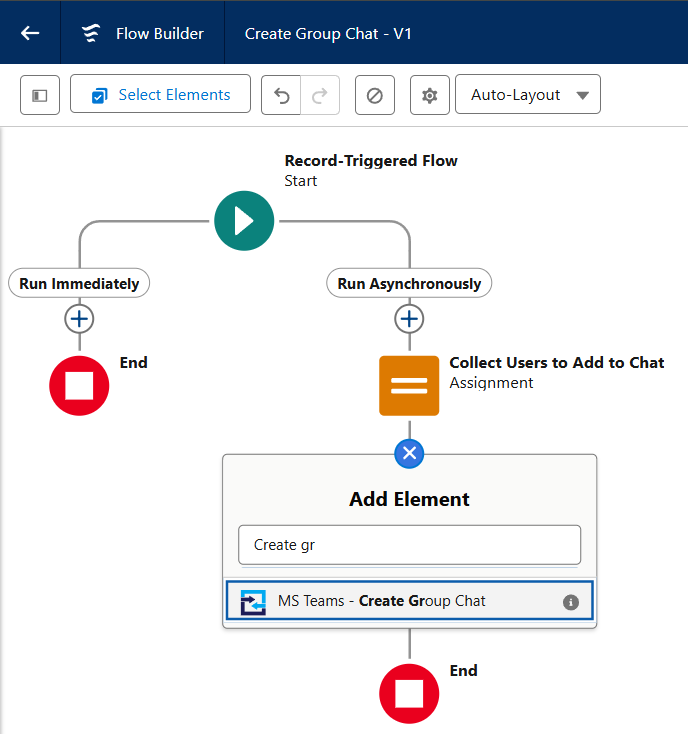
Next, we can add the Element to create the chat.
- Search for Create Group, select MS Teams - Create Group Chat
- Give the new Flow element a Label, allow the API Name to auto populate
- (optional) Provide a description to help you remember the intent of this Chat.
- Search for the Teams Bot that will create the Chat.
- Pick the collection variable previously created.
- Specify the Topic to be used when naming the Group Chat.
- (optional) If you want the Bot to send notifications into this Chat in the future, enable the toggle to include the Bot as a member in the Chat.
One of outputs of this Create Group Chat action is the ID of the Group Chat.
Store this ID somewhere so that it can be referenced later for sending messages into the chat or retrieving messages from the chat.
This could be a Custom Field on the Record, a Custom Setting, Custom Metadata Type, or even a Label.
Sending the Notification
Once the Bot has created the Group Chat, and assuming the Bot was included as a Member we can now send a message.
This example assumes we have created the Notification in the same Flow as where we send the message, but as mentioned above the Chat Id can come from elsewhere.
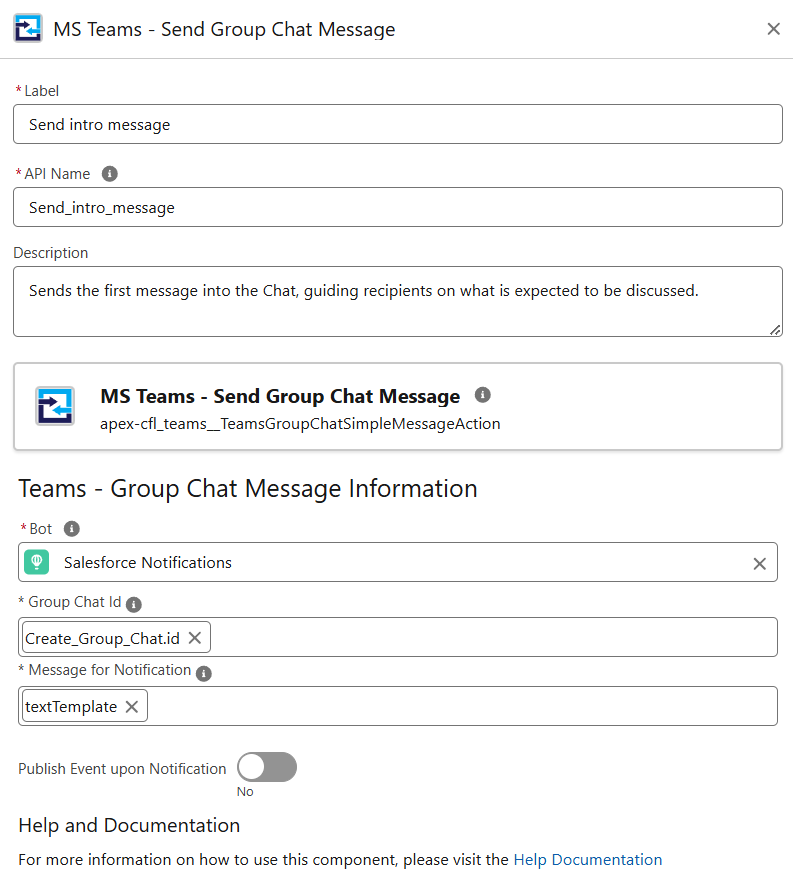
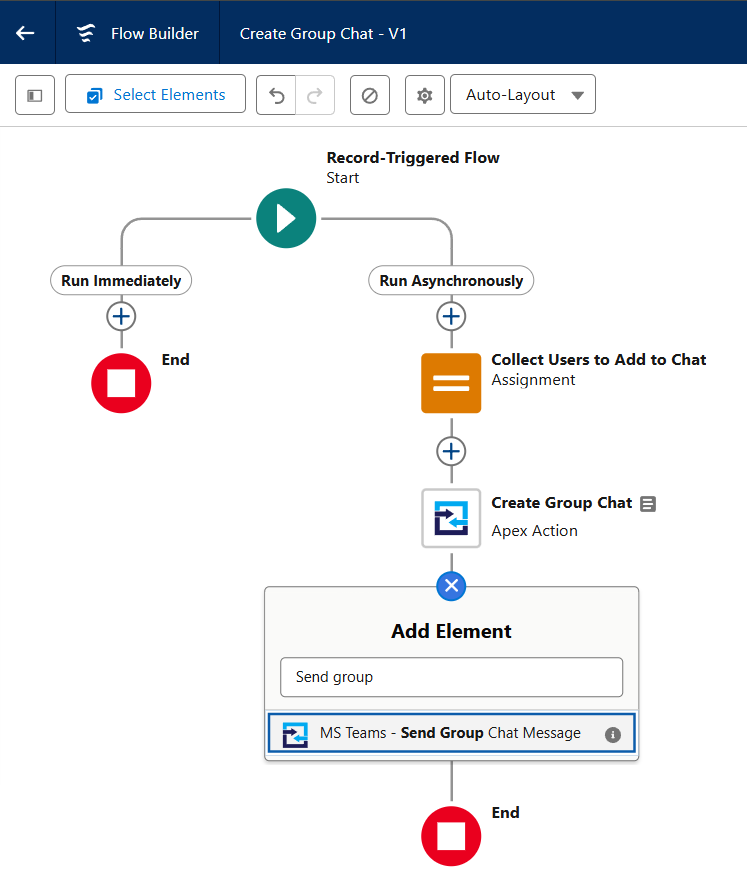
From your Flow, add a new Element.
- Search for Send Group, select MS Teams - Send Group Chat Message
- Give the new Flow element a Label, allow the API Name to auto populate
- (optional) Provide a description to help you remember the intent of this Notification.
- Search for the Teams Bot that will send this notification. It should be the same Bot that created the Group Chat.
- Specify the Group Chat Id. It can come from another element OR from a value previously saved in a record.
- Specify the Message you wish to have displayed.
- Save the Flow
The message can be in Plain Text, or it can be composed using Markdown. (more on that)
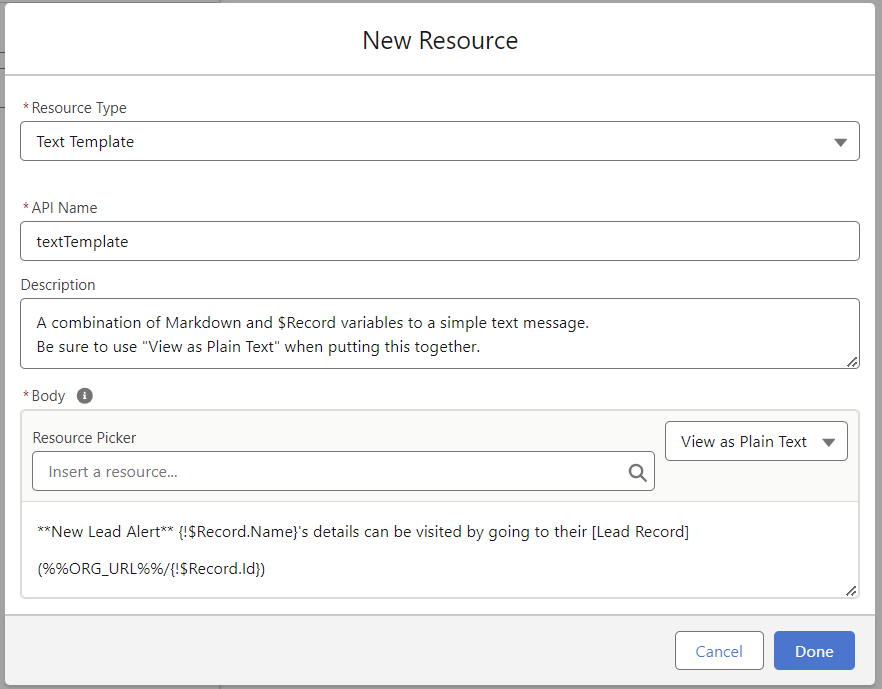
If the message itself is fairly simple, we recommend just typing it into the Textarea directly. If the message is a bit more complicated, or uses more than a couple of Resources, we recommend using a Text Template (as pictured above).
A Text Template is a great way to build a slightly more complicated Message.
- From the Flow's Toolbox, click New Resource
- Choose Resource Type: Text Template
- Provide an API name that you will use inside the Apex Action
- (optional) Add a description for this message
- Body: Make sure to choose View as Plain Text prior to making the message. Rich Text uses HTML for formatting, which is not Markdown compatible.
- Type in the text (optionally using Markdown for formatting) and use the Resource Picker when needed to add fields & data available to your Flow.
Add Member to Group Chat
Creating a Group Chat gives you the opportunity to include a list of Members. However, if you need to add a member at a later time (such as part of a work flow) then this action will be ideal for use.
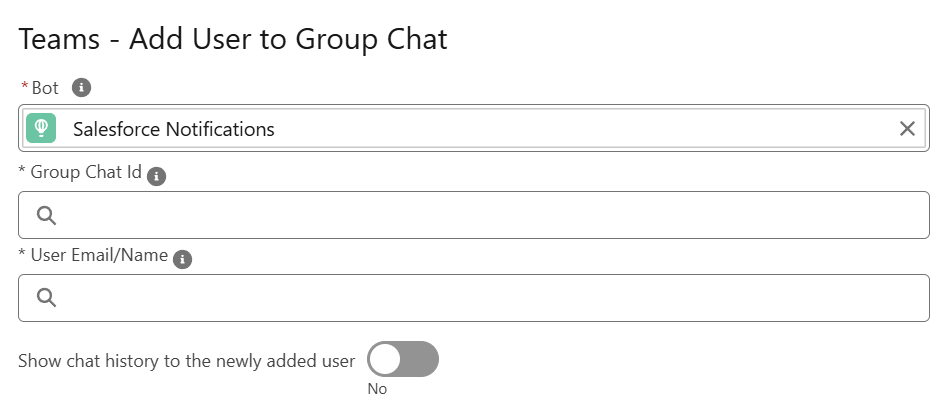
From your Flow, add a new element.
- Search for Group Chat, select MS Teams - Add User to Group Chat
- Give the new Flow element a Label, allow the API Name to auto populate
- (optional) Provide a description to help you remember the intent of this Notification
- Search for the Teams Bot that will be adding the member. It should be the same Bot that created the Group Chat.
- Specify the Group Chat Id. Similar to sending a notification above, it can come from another element OR from a value previously saved in a record.
- If the newly added member should be able to see the chat history, change the toggle to Yes.
- Provide the Full Name or the Email Address of the Teams User you want to add.
- Save the Flow

