Create Bot in Teams
With an active Site available in Salesforce, a Microsoft Teams Administrator can follow a few steps to get things configured.
The Setup Assistant will provide a link to the Teams Instructions that you can give to a Microsoft Teams Administrator. They will be able to use the Instructions page (without a Salesforce User License) to securely provide Salesforce with the information needed.
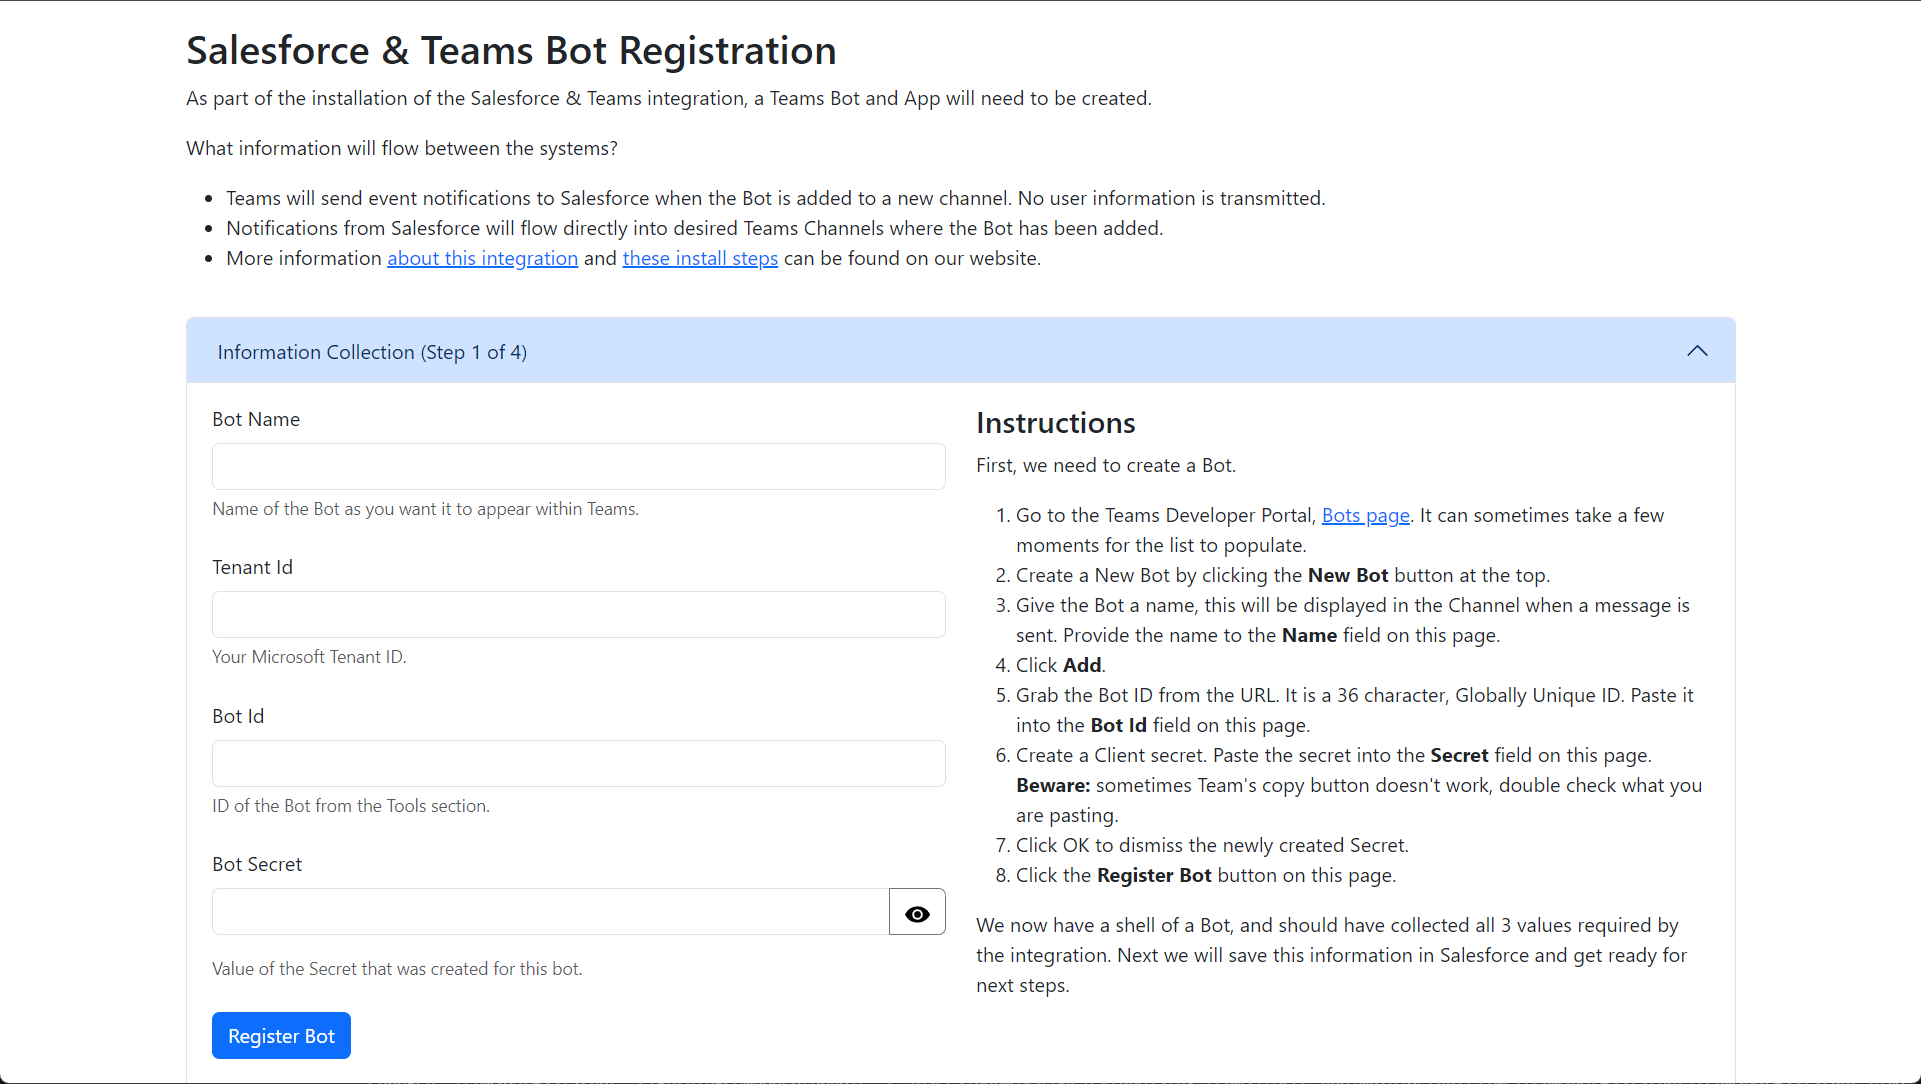
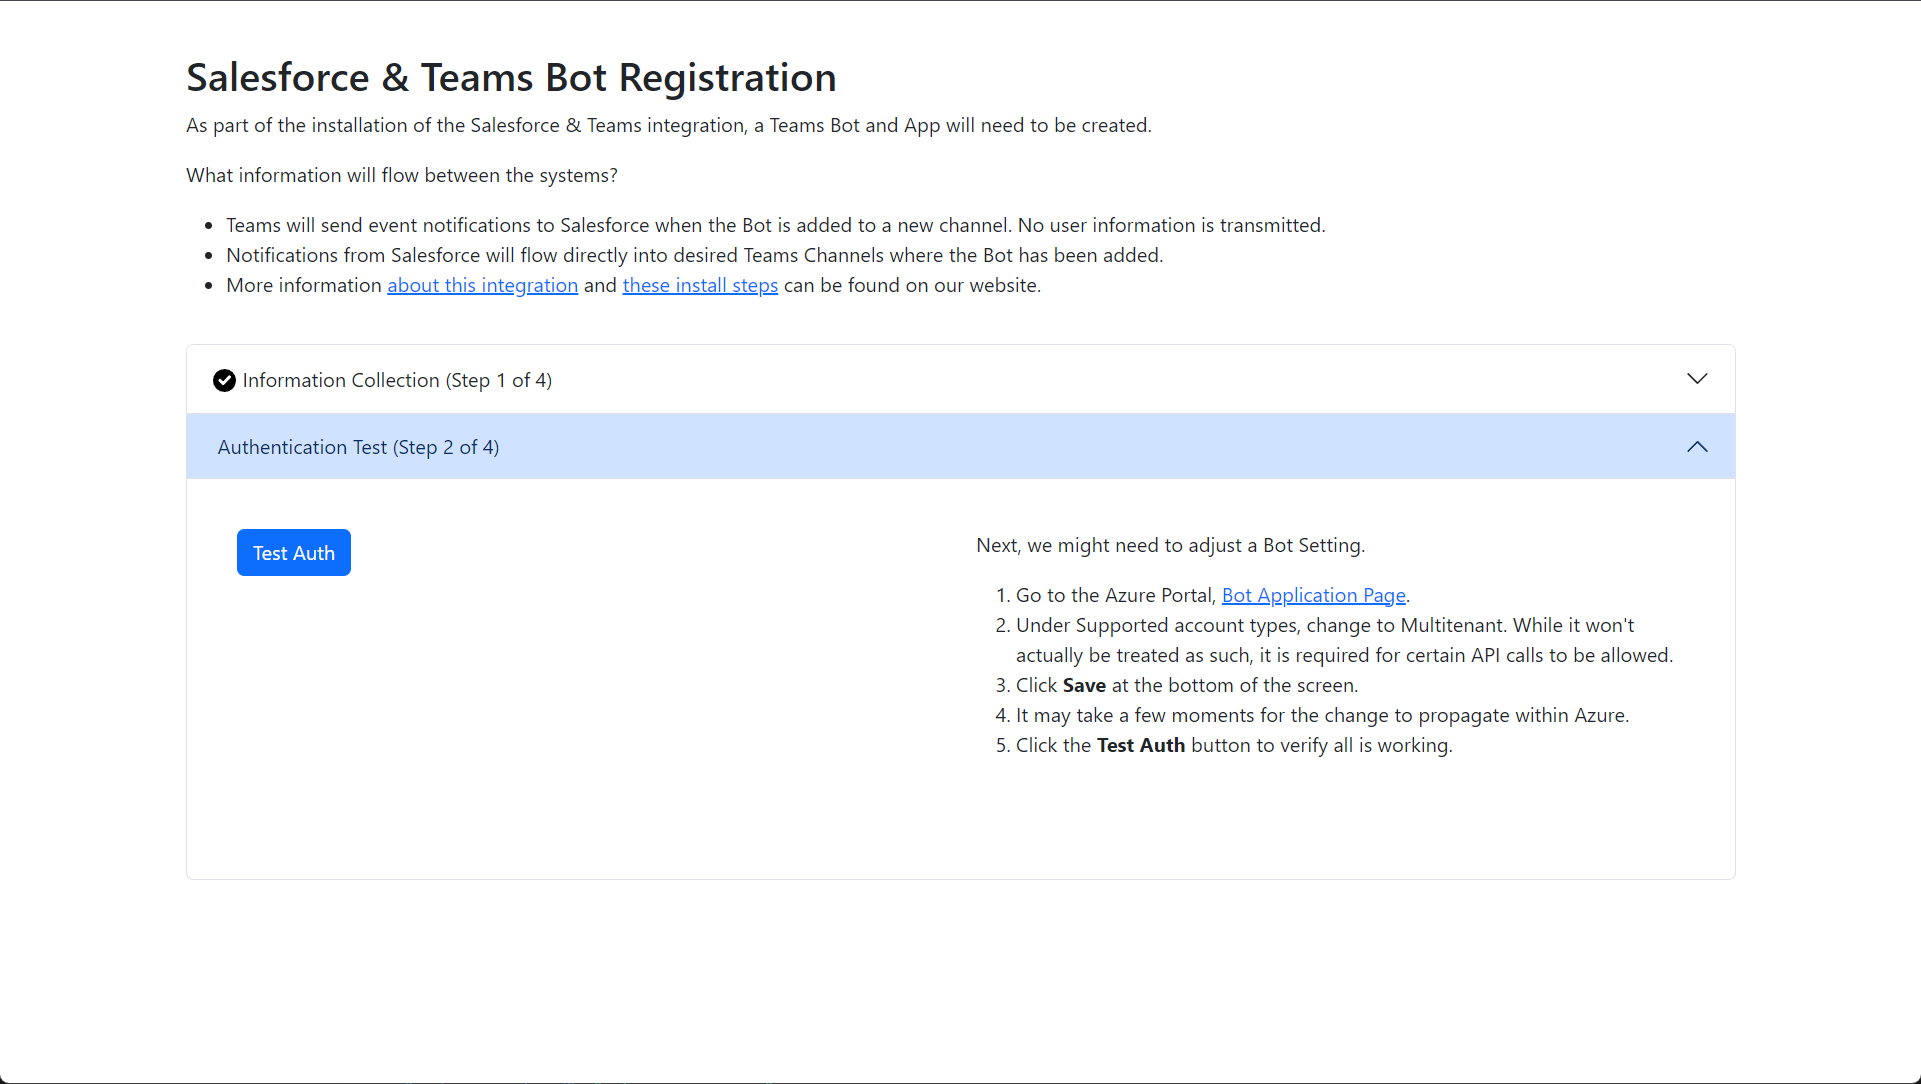
As a Microsoft Teams Administrator, you will likely start by seeing the Salesforce & Teams Bot Registration page that was sent to you.
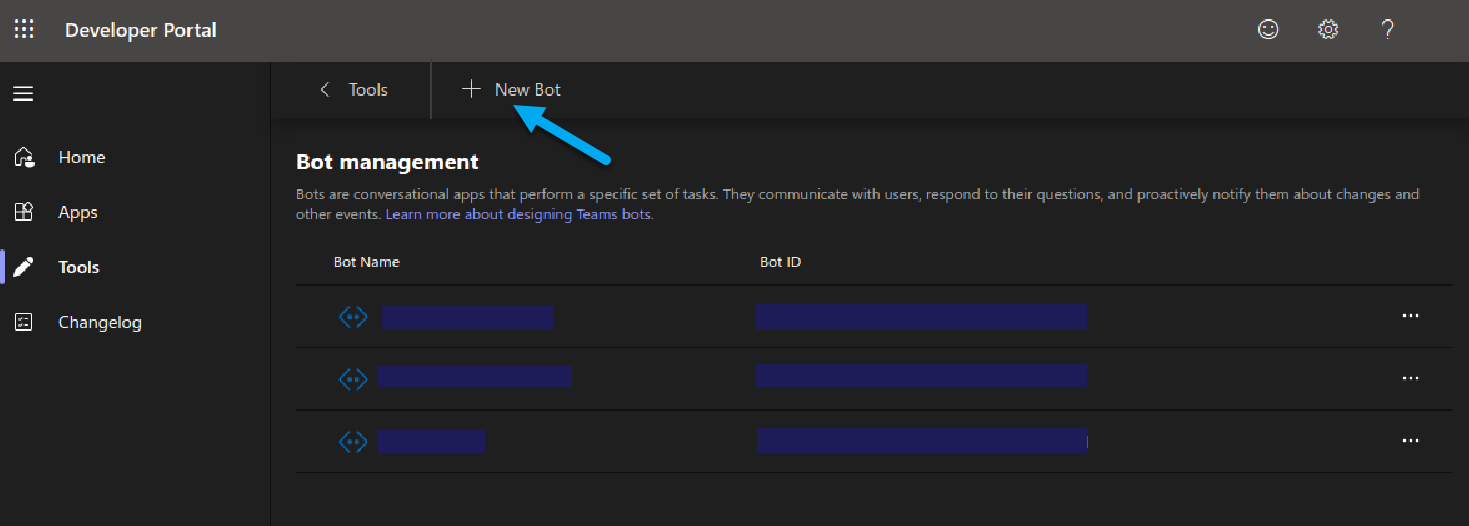
- Get Started by clicking on the Bots page link, which will take you to your Bots Management page in the Developer Portal in Microsoft Teams.
Create Bot in Microsoft Teams
Create a New Bot
- Click the New Bot button at the top.
- Give it a Name. This name will appear whenever the Bot sends a Message.
- Click Add.
- Back at the Instructions page, provide the Name you just used.
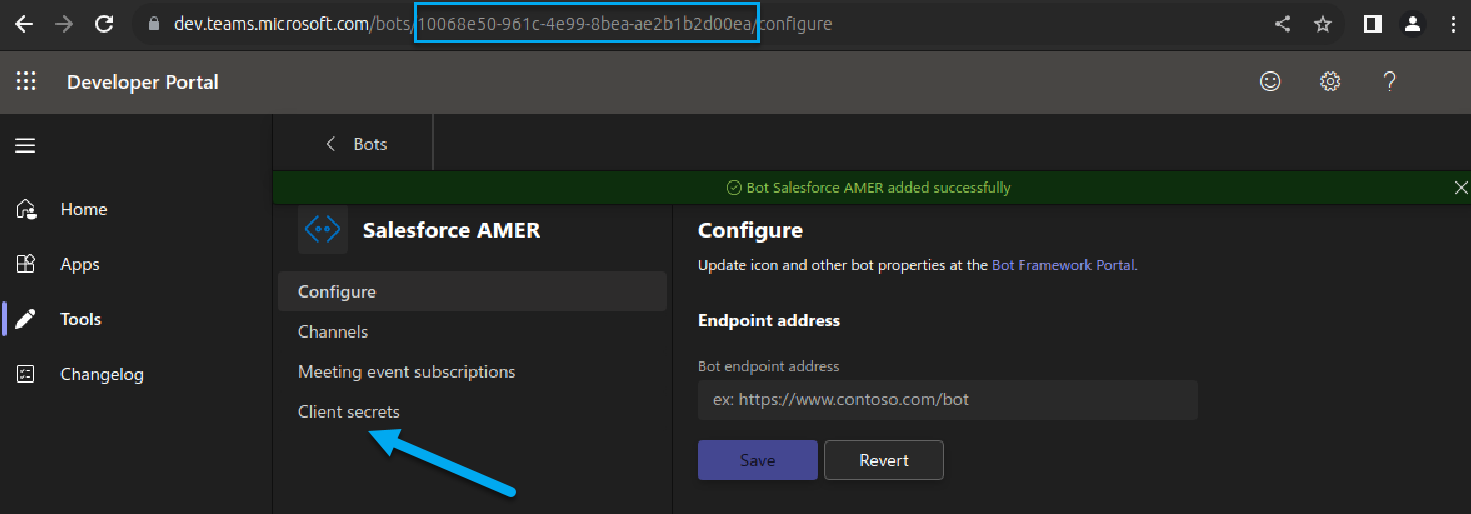
- Next we will need the Bot Id.
- In the Browser Address Bar, copy the Id to your clipboard. It is a 36-character UUID.
- Back at the Instructions page, paste this Id into the Bot Id field.
- Click on Client Secrets.
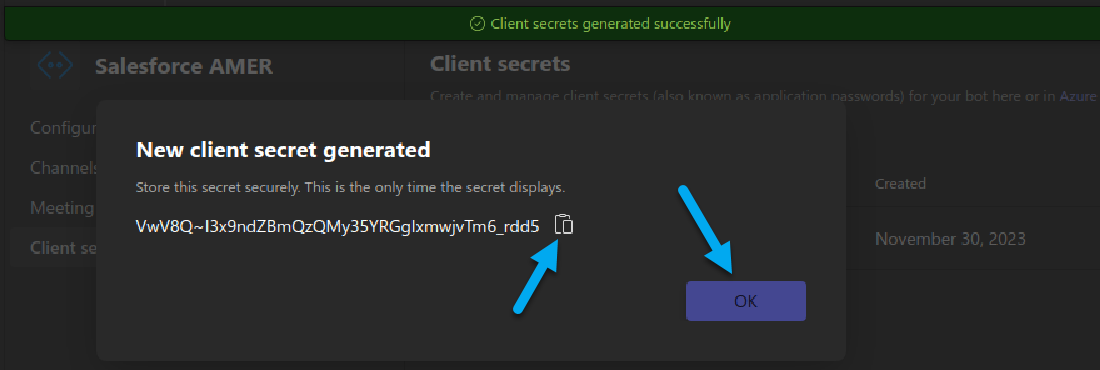
- "Add a client secret for your bot".
- Copy the secret to your clipboard, click Ok.
- Back at the Instructions page, paste this secret into the Bot Secret field.
- (optional) click the eye icon to verify that you are pasting the secret.
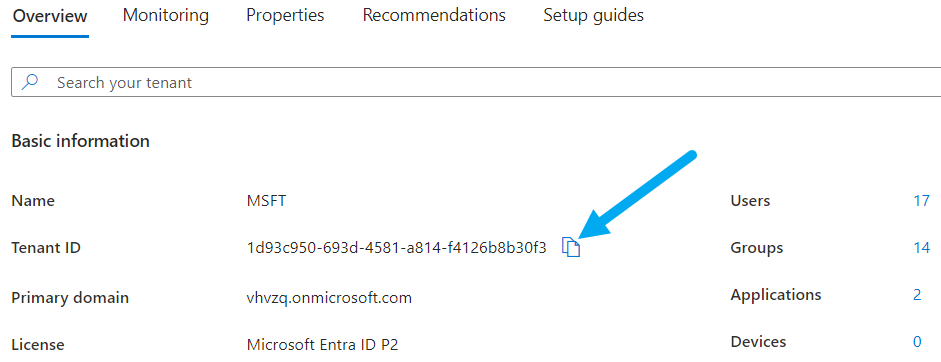
- Next we will need the Tenant Id.
- Copy the Microsoft Tenant Id from the Microsoft Entra admin center.
- Back at the Instructions page, paste this Id into the Tenant Id field.
- With all 4 values collected, Register the bot.
Bots cannot be modified from this page. If an error was made, ask the Salesforce Administrator to delete the Bot and then try again.
Verify Authentication
- Click the Test Auth button. If it is successful, click Next and skip to the next section.
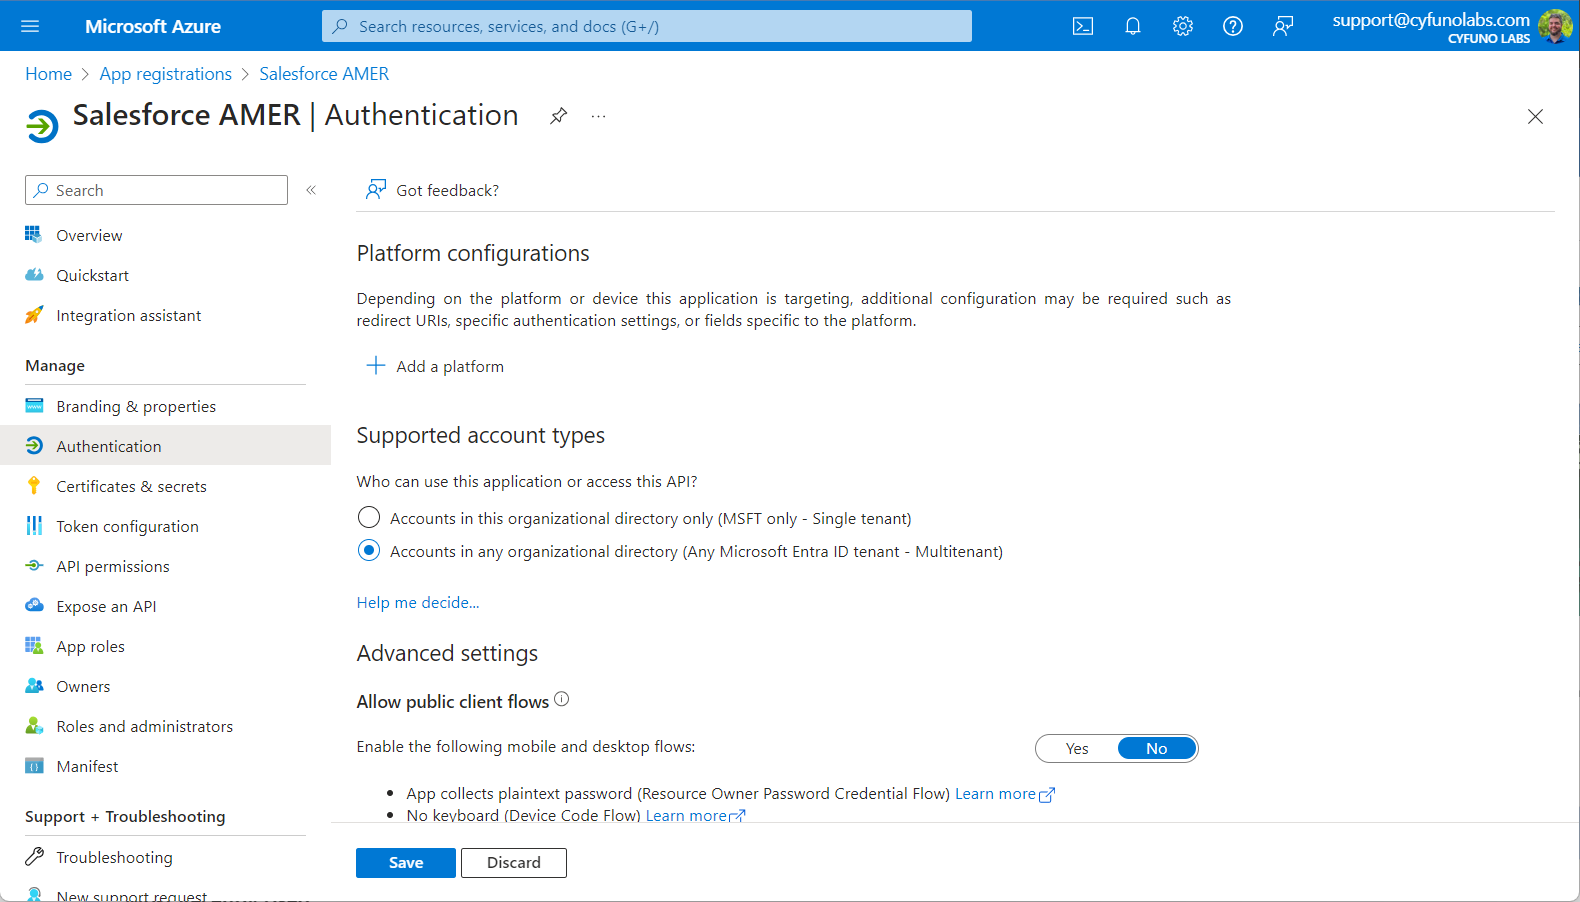
- If there is a failure, we may need to a minor adjustment to the automatically-generated Bot Registration. Click on the Bot Application Page link.
- For the Bot Authentication, select the Multitenant option.
- Save this change, close the browser tab.
We make this change so that the Salesforce -> Teams API calls can work.
Adding Bot API Permissions in Teams
Next, we need to add some API permissions.
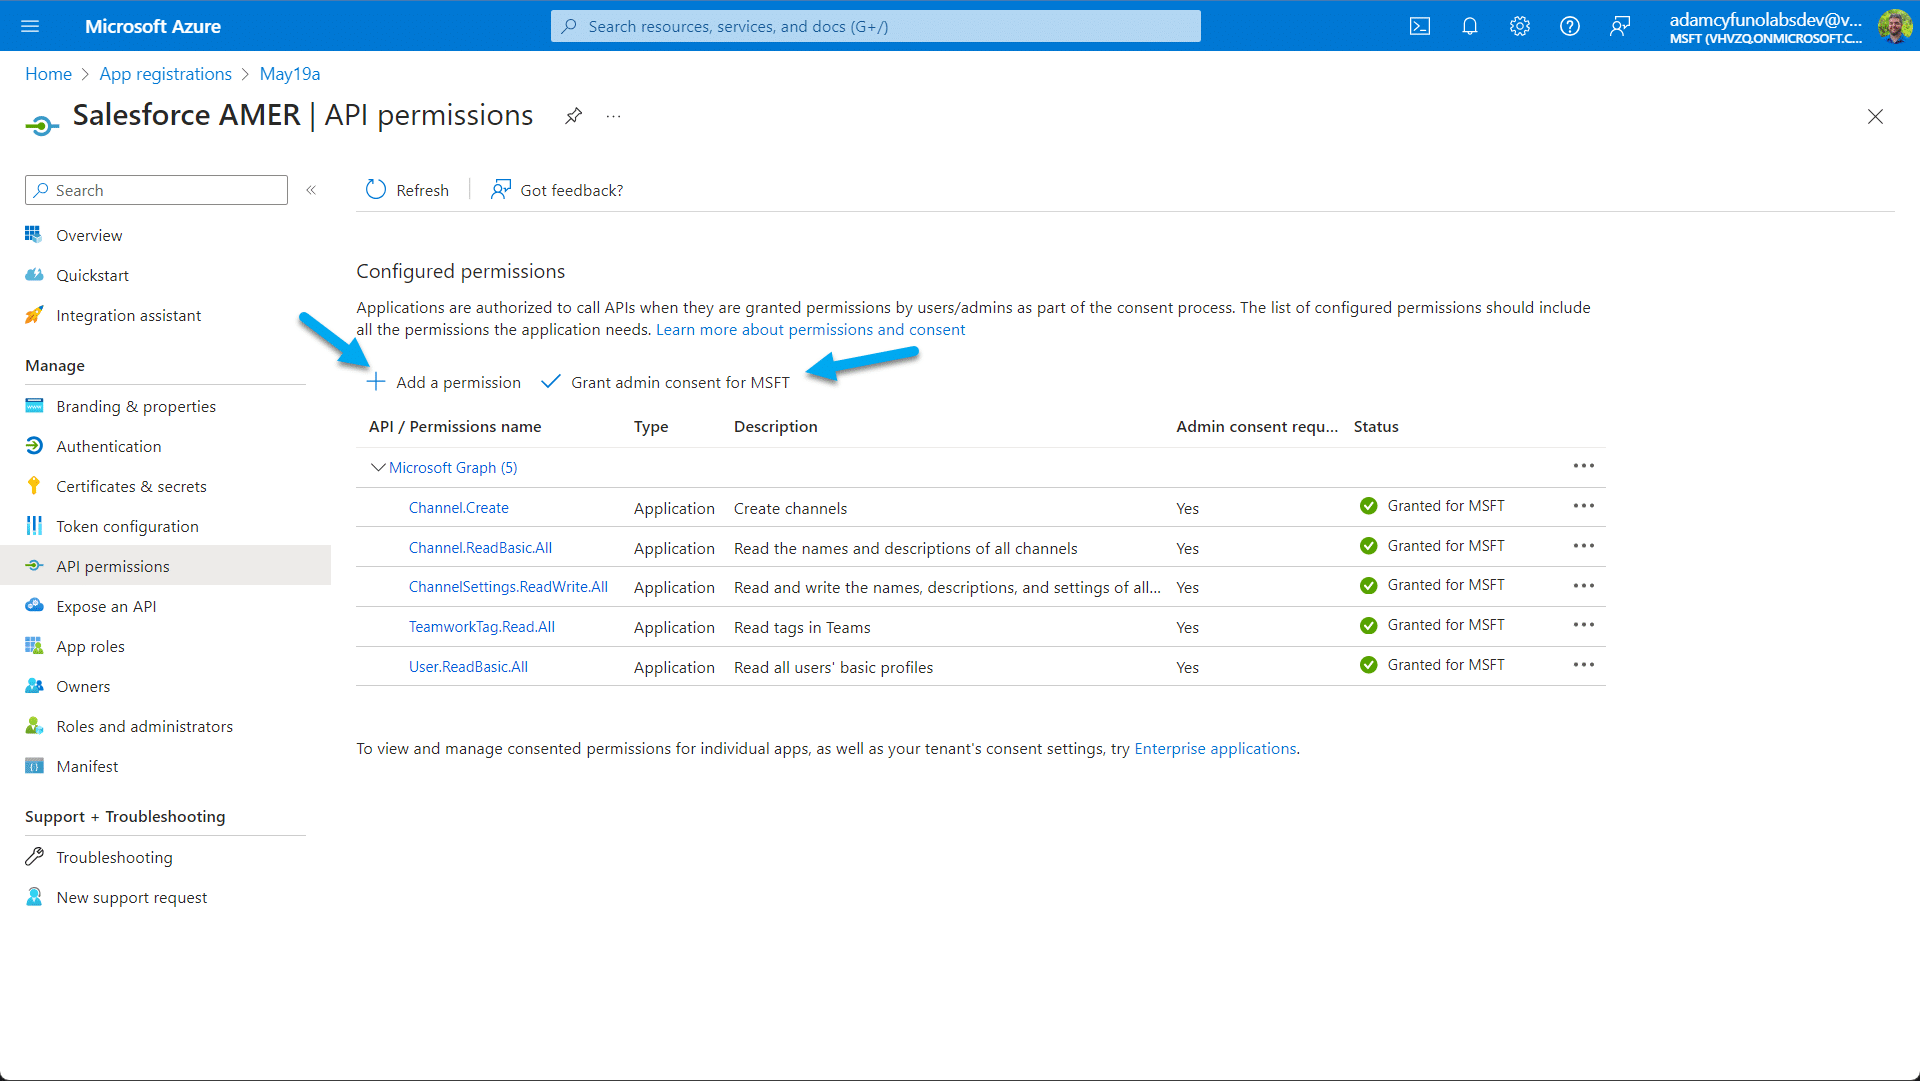
On the Azure Portals Registration page for the app, go to API Permissions.
Click Add a permission, select Microsoft Graph, then select Application permissions.
- Add Channel.ReadBasic.All (this allows us to retrieve the Active Channels on the Team the bot was added to).
(optional) Additional features can be enabled by granting API Permissions. Select the permissions for the features you would like to allow
- Channel.Create & Team.ReadBasic.All -> Allows the bot to create a Channel for the Teams it has been added to.
- Channel.Delete.All -> Allows Salesforce to delete a Channel.
- ChannelMember.ReadWrite.All -> Allows the bot to add/remove a Teams User to a Shared/Private Channel.
- ChannelSettings.ReadWrite.All -> Allows the bot to Archive a Channel, within the Teams it has been added to.
- Presence.Read.All -> Allows the retrieval of Teams User's statuses / presence indicators.
- TeamworkTag.Read.All -> Allows the @mentioning of a Team's Tag by its Display Name.
- User.ReadBasic.All -> Allows the @mentioning of a User by their Display Name or Email address.
- Chat.Create -> Allows creating a Group Chat.
- AppCatalog.Read.All -> Allows retrieving the Bot from the Teams App Catalog, for sending DMs and Group Chats.
- TeamsAppInstallation.Read.All -> Allows retrieving a User-specific Id for this Bot for sending Direct Messages.
-
TeamsAppInstallation.ReadWriteForUser -> Allows the bot to create a DM chat.
-
TeamsAppInstallation.ReadWriteSelfForChat.All -> Allows the bot to add itself to a Group Chat, for sending Messages.
Once permissions have been added, Grant admin consent for all API permissions.
- Back at our Instructions page, click the Test Auth button to test Salesforce -> Teams authentication.
- With a successful test, verify the results.
- Click Next
Finish Setup
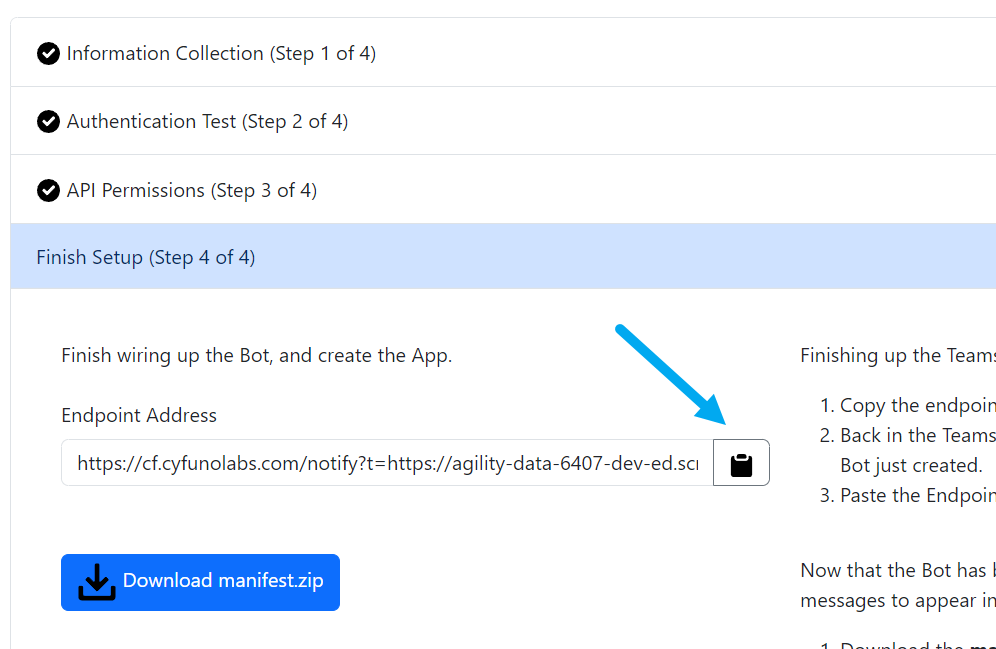
- Copy the Endpoint Address, so that Microsoft Teams knows where to send "Bot was added to a Team" events.
- Back in the Teams Developer Portal, click on the Configure side-tab.
- Paste the Bot endpoint address, click Save.
Adding an App in Microsoft Teams is what allows the Bot to be added to a Team / Channel.
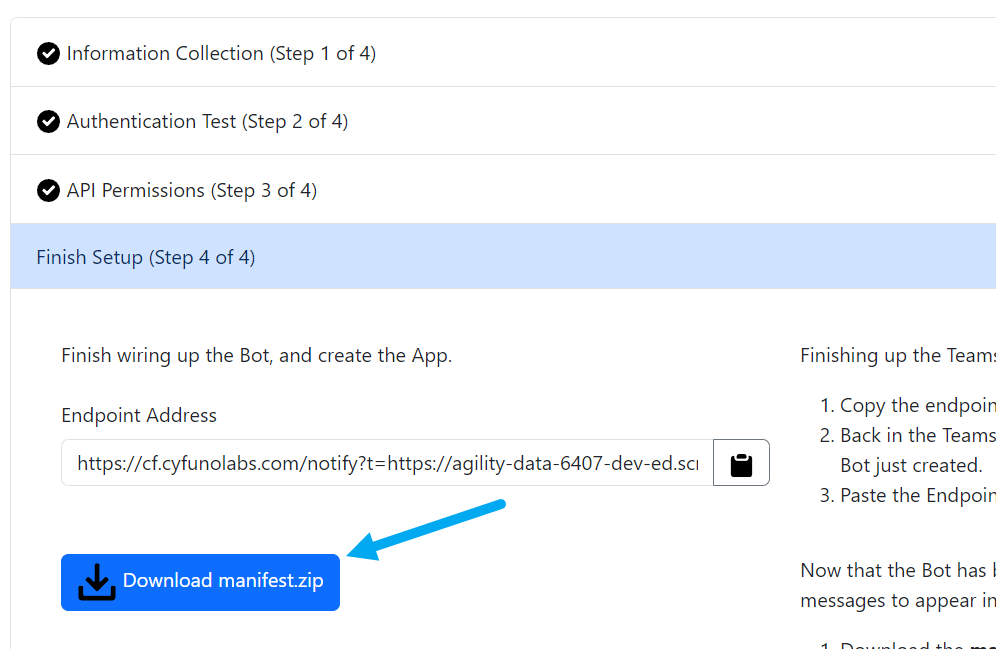
- From the instructions page, Download the manifest.zip file.
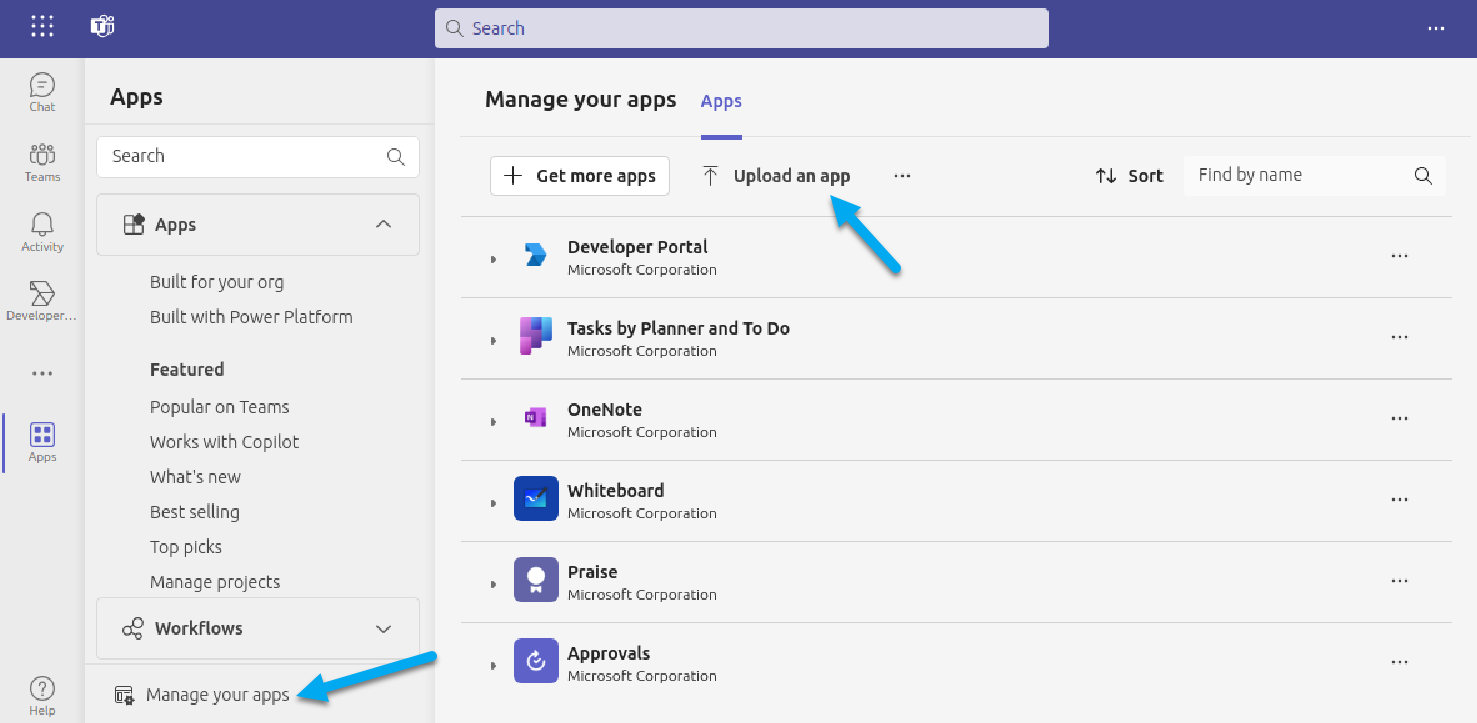
- Navigate to the Teams Apps page from the main Teams UI's left-hand menu.
- Click Manage your apps
- Click Upload an app.
- In the dialog that appears, choose "Upload an app to your org's app catalog".
- Select the manifest.zip file you just downloaded a few steps earlier.
- It can take 1 hour to a couple business days for Microsoft to do its thing in the background.
- You can look at the Pending Requests from the Manage your apps page to see what you've created worked and is in the queue.
Next Up: Adding the Bot to a Team

